
Welcome to a quick and practical guide on changing the light bulb in your outside wall lantern. Illuminate your space effortlessly by following these simple steps. Ensuring safety, How to change light bulb in outdoor wall lantern identifying the right medulla, and proper power management are key to a successful replacement. Whether it’s a burnt-out bulb or a desire for a brighter ambiance, this guide will walk you through the process step by step. Say goodbye to dim exterior spaces and welcome a well-lit and inviting atmosphere. Let’s get started on transforming your outdoor barrier lantern with a fresh and glowing light source.
Safety First
Begin the process of changing the light medulla in your exterior wall lantern by prioritizing safety. Safety goggles and gloves are essential protective gear to shield yourself from potential accidents. Prioritize turning off the power supply at the circuit breaker to eliminate any risk of electric shock. Confirm that the lantern is completely switched off before proceeding. If the fixture has been recently used, allow it to cool to avoid burns. Secure a stable and safe platform, such as a ladder, to reach the lantern comfortably. By adhering to these safety-first measures, you create a secure environment, ensuring a smooth and hazard-free experience while enhancing the illumination of your outdoor space.
Identify Bulb Type
Before changing the light bulb in your outdoor barrier lantern, identify the correct medulla type to ensure a seamless replacement. Refer to the manufacturer’s guidelines or examine the existing medulla for information on wattage and base type. Take note of any specific features, such as dimmability or special coatings, to match the replacement accurately. Choosing the right bulb guarantees optimal performance and longevity for your exterior lighting. Armed with this information, you’re ready to select a suitable replacement medulla that aligns perfectly with your lantern’s specifications, illuminating your outdoor space with the desired brightness and ambiance.
Power Off Fixture
Prior to changing the light bulb in your outside barrier lantern, prioritize safety by turning off the power. Head to the circuit breaker and switch off the corresponding breaker for the exterior lighting. Confirm the power is truly off by testing the lantern switch. This precautionary step ensures you won’t face any electrical hazards during the medulla replacement. If working with a wired lantern, use a non-contact voltage tester to double-check for any remaining electrical current. By powering off the fixture, you create a secure environment for the task at hand, allowing you to confidently and safely proceed with changing the light bulb and enhancing your outdoor illumination.
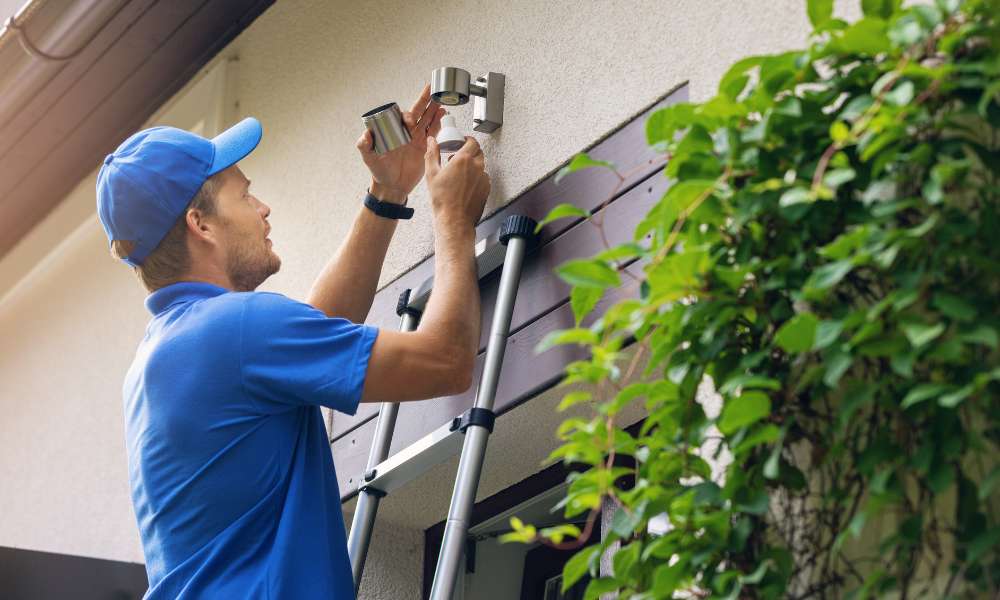
Remove Old Bulb
Carefully remove the old light medulla from your outdoor wall lantern to pave the way for a brighter ambiance. Ensure the power is off, and let the existing bulb cool if recently used. Gently unscrew the medulla counterclockwise, avoiding any excessive force. In cases where the bulb is stuck, consider using a cloth for better grip or seeking professional assistance. Dispose of the old medulla appropriately and be cautious of any residual heat. This step is pivotal in the process of refreshing your exterior lighting, making way for a new bulb that will rejuvenate your space with luminosity and charm.
Install New Bulb
With the old bulb removed, it’s time to usher in a renewed glow by installing a new one in your exterior barrier lantern. Confirm the wattage and base type match the specifications recommended by the manufacturer. Hold the new medulla securely and align the base with the socket, then gently screw it in a clockwise direction until snug. Avoid over-tightening to prevent damage. Ensure a secure fit for optimal performance. If the lantern accommodates multiple bulbs, change light bulb in outdoor wall lantern repeat the process for each. This simple yet crucial step sets the stage for a brilliantly illuminated outdoor space, bringing life and warmth to your surroundings.
Test and Secure
After installing the new medulla in your exterior wall lantern, proceed with a thorough testing phase to ensure a flawless illumination. Turn on the power at the circuit breaker and activate the lantern switch. Confirm that the new medulla lights up efficiently. If any issues arise, double-check the bulb’s installation, wattage compatibility, and the power supply. Once satisfied with the test results, secure the lantern by tightening any fasteners or screws. Confirm that the fixture is stable and properly aligned. This final step ensures not only the success of your medulla replacement but also a well-secured and brilliantly lit outdoor space, enhancing both safety and aesthetics.
Conclusion
Congratulations on successfully changing the light bulb in your outside barrier lantern! By prioritizing safety, identifying the correct medulla, and following the installation steps, you’ve transformed your exterior space with renewed brilliance. Enjoy the enhanced illumination and ambiance. Regularly check and maintain your exterior lighting to ensure a consistently inviting atmosphere. With these simple steps, you’ve not only brightened up your surroundings but also empowered yourself to efficiently manage and upgrade your home’s exterior lighting. Illuminate your exterior space confidently and revel in the inviting glow you’ve created.